|
6.
Menu-Driven and Calculator Projects
In this lesson
we will consider two projects, one a menu driven drawing project and the other
a calculator project. Menus are one of
the most important and most characteristic elements of the Windows User
Interface. Menu Commands are similar
to Controls. They recognize only the
click events. When you group controls
as arrays, give them the same name property, but give their index property as
0, 1, 2, 3 etc. to distinguish them.
1.
Menu Driven Project:
A view of the Menu bar and
some Menu Items:
Suppose we
want to build a program with a menu bar with two titles and one or more menu
items for each of the menu titles somewhat as shown in the figure 1. In this example the menu items denote
different pixel values for drawing lines.
The different menu items are connected to appropriate codes which will
enable you to select the pixel thickness from the menu and draw figures of of different
thickness.
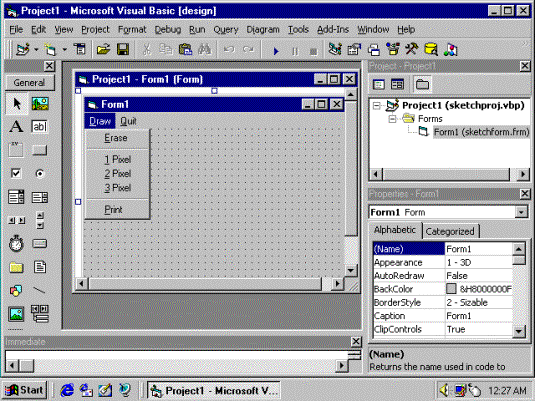
Figure 1
Menu Editor Window:
Start VB from
the Standard EXE mode. Select the item
“Menu Editor” from the Tools Menu. The
Menu Editor Window appears as shown in the figure 2. This window lets you create a menu bar that contains all the
menu items you want.

Figure 2
Creating the Menu Bar:
In this
project we will have only two menu titles in the menu bar. Of course one can have as many as required
for the concerned problem. The first
title is ‘Draw’. Type ‘&Draw’ in
the Caption field. The & symbol
before D tells that D is a hot key and users can use alt+D key combination to
pull down the menu. Next press the Tab
key. This moves the insertion point to
the next text box ‘Name’, which is the name of the control. Enter ‘menDraw’ in the Name field and click
the right arrow key at the bottom of the menu editor window. This is how the computer recognizes the
item as menu title. The prefix ‘men’ is
used to indicate to the users that the item ‘Draw’ is the name of the menu
title. The Caption field is cleared to
enable the next menu title to be entered.
Now enter ‘&Quit’ in the Caption field and ‘menQuit’ in the Name
field and click OK. Now the design
window will show a menu bar with two items ‘Draw’ and ‘Quit’. At the bottom you will see the two items
entered as shown in the figure 2a.
&Draw
&Quit
Figure
2a
Creating Menu Items:
Now we have to enter the menu items under the menu titles Draw
and Quit. B Open the Menu Editor
Window. Select &Quit. Select Insert. This action will insert a line between the two items. Type &Erase in the Caption field and
miErase in the Name field. The prefix
‘mi’ indicates that the item ‘Erase’ is a
menu item and not a menu title.
Now the bottom window will appear as shown in the figure 2b.
&Draw
…&Erase
&Quit
Figure 2b
In
a similar manner add the menu item Exit for the menu title Quit. Use the Caption name as E&xit and the
control name as
miExit.
   |